11.30.2009

How To: Caramelize an Onion

Well, another first for my Little Kitchen... caramelizing an onion. This was starting to feel like a secret ingredient to me on great sandwiches, pizzas and even soups. These salty and sweet onions seem to make everything a little gourmet and a little special so I decided it was time to experiment. In my experiment, I found two keys to great onions... time and temperature...lots of time and low temperature. Do not be scared by the lots of time. Although it can take up to an hour for great caramelized onions, it is not necessarily hands-on time. You need to give these a good stir every once in a while, but I made these while I cleaned the kitchen and made dinner one night. I was also able to use the onions all week on sandwiches and pizza. I have to say they are my new secret ingredient on my chicken pesto pizza. So make a batch and use them all week.


How To: Caramelize an Onion
1.  Slice off the top and root ends of the onions and peel.
2.  Thinly slice the onion.
3.  Heat a wide saute pan over medium high heat.  Coat the bottom of the pan with olive oil (about a teaspoon per onion).
4.  Spread onions evenly so that they cook evenly.
5.  After 10 minutes of cooking, sprinkle with salt.
6.  Gently stir onions every few minutes. The key is to give the onions enough time to brown, but to stir them before they burn.  Allow to cook for about an hour.
7.  If onions are close to burning, lower heat a little and add a little extra oil.
8.  After about 30 minutes, scrape the pan of all brown bits and every ten minutes as the caramelization process continues.  Cook until the onions are brown and a little bit mushy.  You might need additional time if you have a large batch.
9.  Optional: At the end of caramelization, add a little bit of balsamic vinegar to help deglaze the pan and add extra flavor.
10.  Use immediately or store in refrigerator in an airtight container for up to a week.

At the beginning...


After 15 minutes...


After 45 minutes...


After 1 hour...


The onions made this Chicken Pesto Pizza extra special.  I only put them on half in case we didn't like them, but that was a mistake.  They are the best part of the pizza!

11.23.2009

Turkey & Cranberry Ravioli... a.k.a. Pilgrim Potstickers


I have to admit I was a tad bit nervous about the recipe.  I have learned over the years that if something doesn't sound right, it usually isn't (EX. strawberry risotto... even if an Italian chef made it in Florence), but I was willing to take a chance because it had amazing reviews on Food Network.  I changed it up a little after my coworker, Frances, and I had a conversation about how turkey sausage might have more flavor than just regular ground turkey.    I decided to use half ground turkey and half sweet italian turkey sausage.  I think this was a good move because there was a smoky sage flavor that I believe came from the sausage.  If you are looking to buy as few ingredients as possible, you could try the original recipe, but I can't make any promises.  Needless to say, I am pretty sure it wouldn't matter what you put in the middle of these little wrappers because once you taste the cream sauce on top, you will be in heaven.  There was definitely some preparation involved in this one so I decided to make them a couple of days in advance and freeze them.  I suggest doing this so that you don't get bogged down trying to put ravioli together before guests arrive.  
Once again (I seem to be giving this disclaimer more and more.. sorry), I did not share this for the fantastic final picture.  If you are going for visual appeal, this might not be your dish.  It looks a little bit like a blob on your plate, but they sure are delicious!  Oh yeah,  and my brother came up with the idea of calling them Pilgrim Potstickers, which I thought was pretty darn perfect. 
From my Little Kitchen to yours... Enjoy.


Toasting fresh bread crumbs... I put them in a mini food processor after I toasted the bread with olive oil and removed the edges.


Removing the casings of the turkey sausage.  Not pretty, but wanted to show in case you have never done this before.


Turkey & Cranberry Ravioli
Adapted from Giada De Laurentis
Ingredients
1/2 pound ground turkey, preferably dark meat
1/2 pound Italian turkey sausage, removed from casings
8 tablespoons cranberry sauce (I used the whole berry kind over the jellied kind)
8 tablespoons grated romano cheese
4 tablespoons toasted bread crumbs
4 tablespoons fresh parsley leaves
4 eggs
1 teaspoon kosher salt
1 teaspoon freshly ground pepper
80 store-bought wonton wrappers (2 packages)
for the cream sauce:
12 tablespoons butter
4 shallots, chopped
4 tablespoons all-pupose flour
2 cups chicken broth
8 tablespoons heavy cream
4 tablespoons chopped parsley leaves
1 teaspoon kosher salt
1 teaspoon freshly ground pepper
Step by Step
Make the ravioli:
In a medium bowl, stir together turkey, turkey sausage, cranberry sauce, cheese, bread crumbs, parsley, eggs, salt and pepper.  Place 10 wonton wrappers at a time on a work surface.  Brush each wrapper with water using a pastry brush.  Spoon 1 tablespoon of the turkey mixture on each of the wonton wrappers.  Top with another wonton wrapper and seal each ravioli.  Make sure to press out any air bubbles to tightly seal. Repeat 3 additional times until all turkey mixture has been used. 
To freeze for later:
Line a deep dish with wax paper.  Place ravioli in a single layer on top of wax paper.  Continue to alternate wax paper with single layers of ravioli.  Cover tightly and freeze for up to one month.  When ready to cook, take out of the freezer and cook for an extra 3 to 4 minutes, until turkey mixture is cooked thoroughly.  
Make the gravy:
In a medium, heavy skillet, heat the butter over medium heat.  Add the shallots and cook until tender, about 5 minutes.  Add the flour and stir until cooked, about 1 minute.  Slowly add the chicken broth, stirring quickly to avoid lumps.  Add the cream, parsley,  salt and pepper and cook, without boiling, for two minutes.  Make sure to stir often to avoid lumps and keep the sauce from burning.
To cook the ravioli:
Bring a large pot of salted water to boil over high heat.  Add the ravioli and cook until tender but still firm to the bite, making sure that the turkey is cooked, about 3 to 4 minutes.  Drain the ravioli and stir into the sauce to coat.  Serve immediately on individual plates with the remaining sauce drizzled on top. 


Serves 8
 (5 ravioli per person)


11.22.2009

Thanksgiving with a Twist

This year, we had a Thanksgiving dinner with a twist. We are spending the holiday with the in-laws again this year so we had an early Thanksgiving celebration with my family.  I wanted to use some of the usual Thanksgiving meal suspects (turkey, cranberries, apples) for the meal, but I thought I would mix things up this year.  There were no costumes involved so I thought I would try to make the food exciting.  I had been pondering the menu for awhile, and then I saw and episode of Giada's Everyday Italian and my menu was complete.  The topic was "Thanksgiving for two"and I thought it was easily adaptable for six.  I thought turkey and cranberry ravioli was about as out of the box as you could get.  Adding a few other recipes I wanted to try, and a pumpkin pie I was given as a Thanksgiving treat from work, my menu came out as follows...

Tomato Basil Soup
Cheddar Dill Scones

Turkey & Cranberry Ravioli
Cornbread Panzanella

Apple, Cranberry and Walnut Torta
Pumpkin Pie with Vanilla Ice Cream

Considering I had only had the cheddar dill scones, I knew I was taking a pretty big gamble, but I thought my family would be forgiving if anything went terribly wrong.  The tomato basil soup is a new favorite (and went perfectly with the scones) and the turkey and cranberry ravioli was surprisingly delicious as well.  The cornbread panzanella was okay, but not good enough to be made over and over again.  The dressing was delicious and I will experiment with it on other dishes.  The torta was also not an all time favorite.  It was great with ice cream, but not exactly a star dish on its own.  Stay tuned though because I think I know of a way to make it better.    So that's what the little kitchen has been cooking this weekend.  Be back tomorrow with my favorite recipes from the meal.


11.18.2009

Baked Brie + A Memorable Thanksgiving


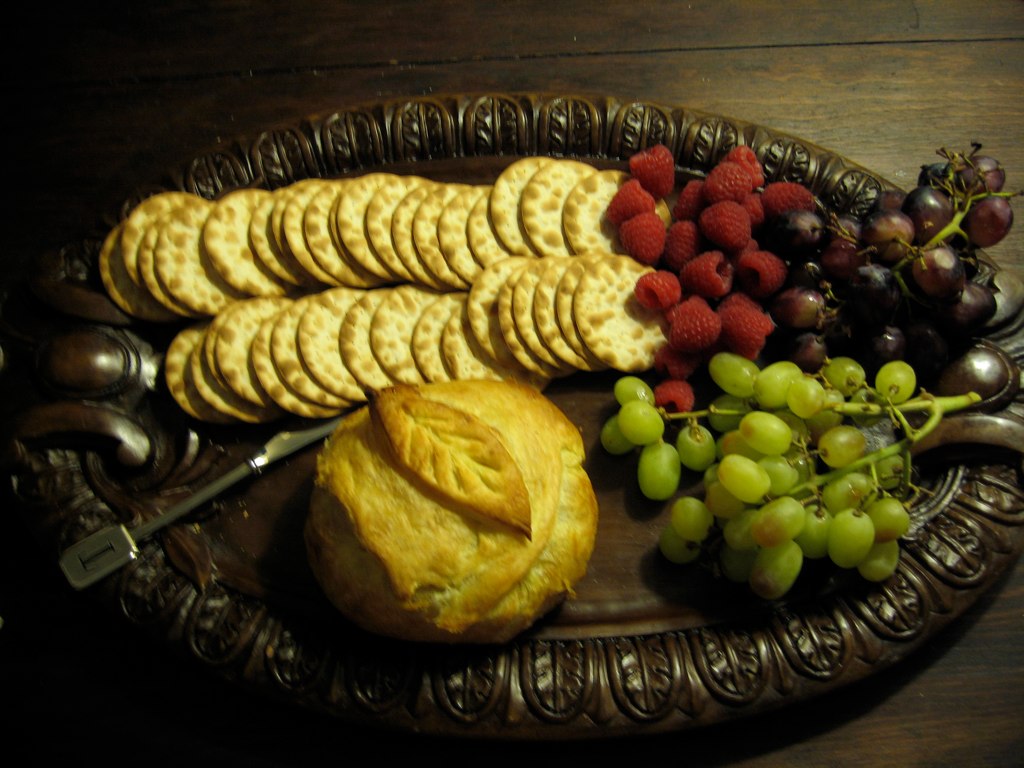
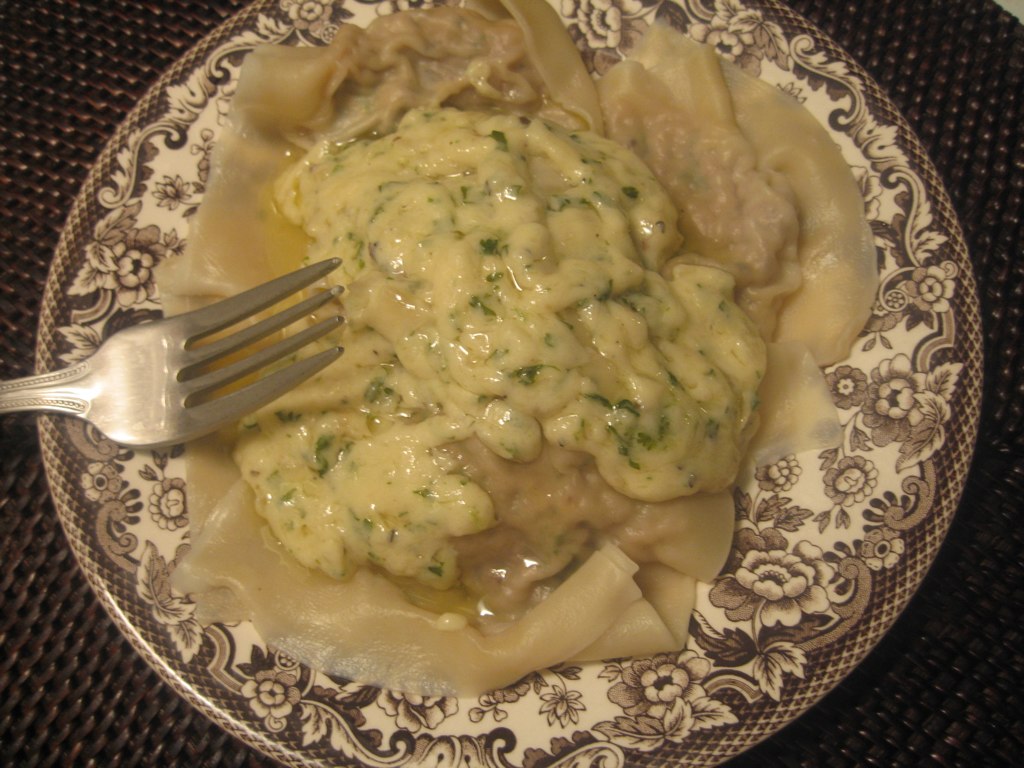
Thanksgiving means many different things to many different people.  For some, it is highly anticipated to see cherished family and eat great food.  For others, it's a time to choke down grandma's fruit cake and spend the weekend with the only people they don't choose in their lives... family.  No matter where you fall on the scale, there seems to be a common thread... food.  For some, it's a traditional turkey and stuffing.  For others, it's tofurkey and brussel sprout.  No matter where you fall on this scale, everyone loves good appetizers.  I made this baked brie last year for our family Thanksgiving and I have to say it was quite a hit, and so simple.  Since I made this before I was sharing my Little Kitchen with the world, I do not have a picture of every step, but I promise anyone can do this.  The creaminess of the brie mixed with the crunch of the nuts and the slightly sweet tang of the apricot preserves all wrapped in a warm puff pastry is absolutely delightful.  Oh, and just in case you are wondering, I definitely consider myself to be in the first group of holiday goers... can't wait to see wonderful family and eat delicious food.
Baked Brie
Ingredients
1/2 package frozen puff pastry, thawed
1 8 oz round brie cheese wheel
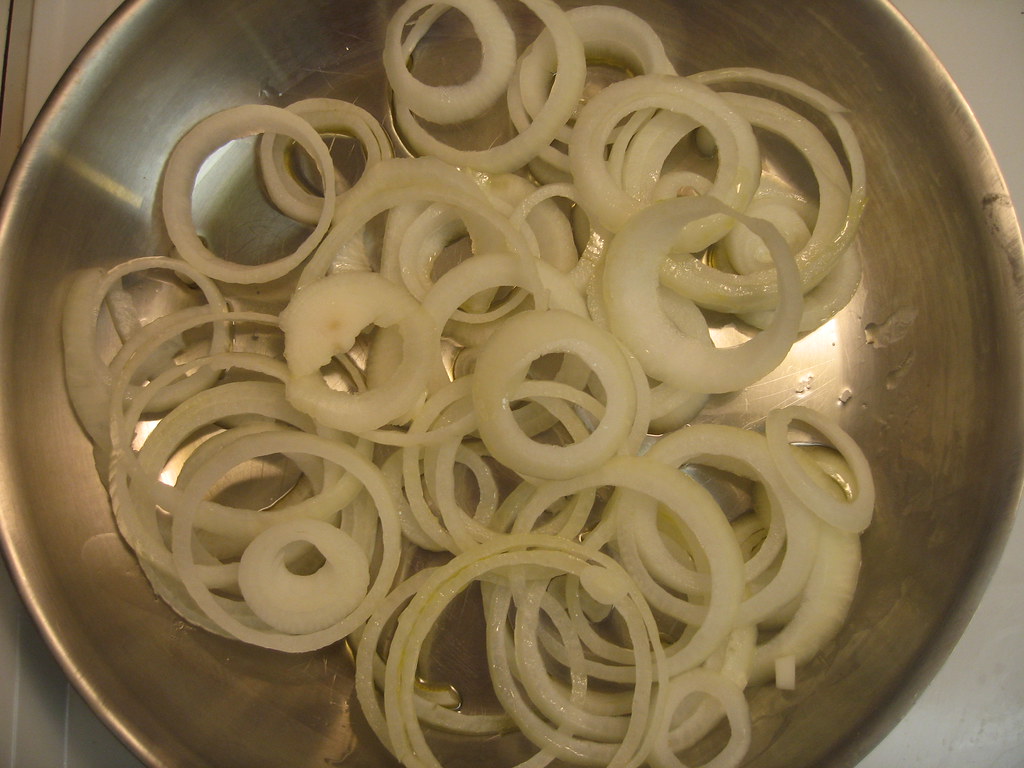
1/8 cup toasted pecans
1/4 cup apricot preserves
egg wash, one egg lightly beaten with one tablespoon of water
Step by Step
1.  Preheat oven to 425 degrees.
2.  Lightly grease a cooking sheet or use a non stick cookie sheet.
3.  Roll puff pastry out slightly on baking sheet.
4.  Sprinkle pecans in the middle of the pastry (no wider than the wheel of brie)
5.  Spoon preserves on top.
6.  Place cheese wheel on top of nuts and preserves.
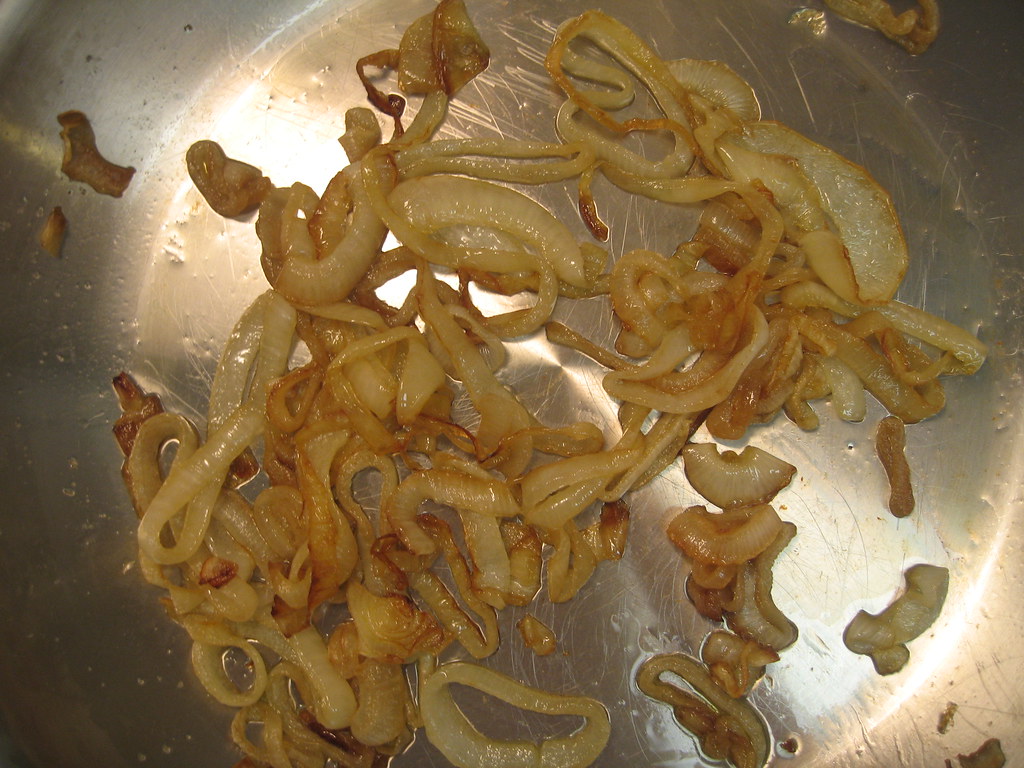
7.  Bundle pastry dough around brie being careful to closely wrap the dough on the brie without letting the dough tear..
8.  Flip the pastry over and make sure all corners are tucked in underneath the pastry so that the preserves do not leak out while being cooked.
9.  Optional:  Use additional pastry to cut a shape and place on top of pasty dough.
10.  Using a pastry brush, lightly coat the pastry dough with the egg wash.
11.  Bake for 20 to 25 minutes, until pastry is golden brown.
12.  Serve with your favorite crackers and fruit.

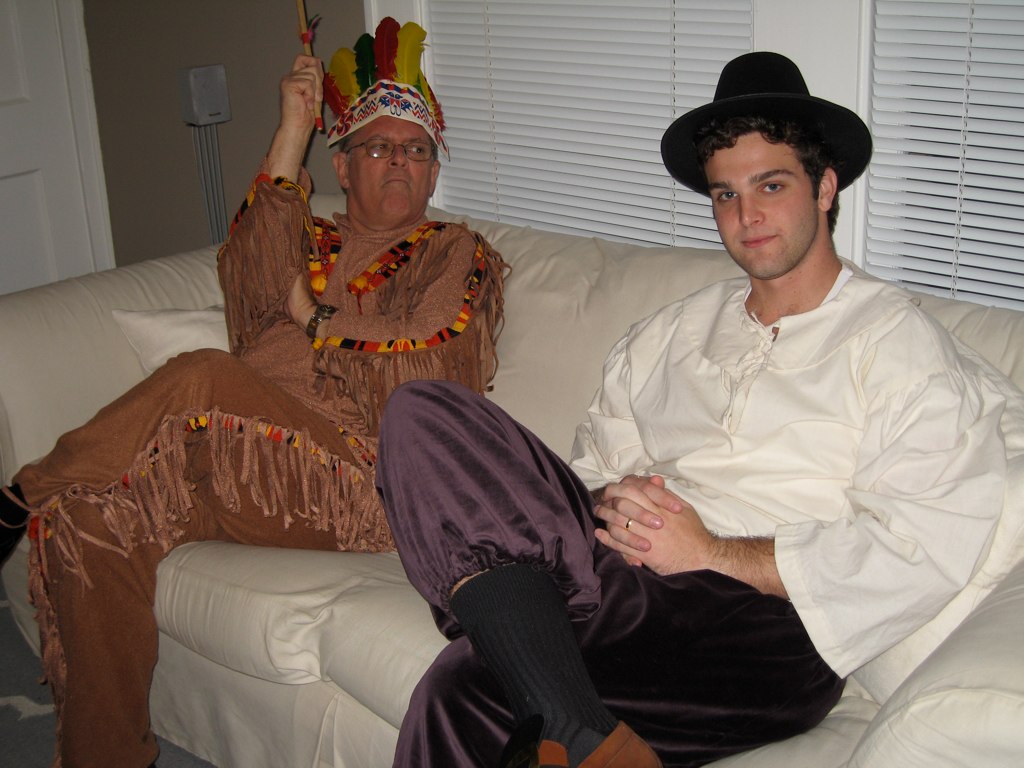
And on to what I call a memorable Thanksgiving... Last year was a first for me and my family. It was our first holiday that my brother and I would both be with in-laws.  I was excited to spend Thanksgiving with Mr. Hungry's family, but I did not want this year to be remembered only for the fact that my parents  did not have either of their children for the first time.  So instead, Mr. Hungry and I went to an extreme length to turn this into the most memorable Thanksgiving my family has ever seen.  We decided to have a traditional Thanksgiving meal a week before the actual day with everyone's favorite dishes.  This is all that my parents and  brother and sister-in-law knew.  They had no idea that when they arrived, there would be two pilgrims greeting them with costumes to turn this into a traditional celebration of Pilgrims and Indians.  Or that we would spend the night playing Thanksgiving themed games.  I will say, the first 10 minutes of my parent's arrival was spent with tears rolling down both of their faces in disbelief of Mr. Hungry in a pilgrim's cap.  It was memorable to say the least.  I have a feeling I will soon be getting in trouble for sharing these pictures, but I just thought if there was anyone out there that needed to turn a sad holiday into a memorable one, a few head dresses and prairie skirts can do the trick.  I was inspired to share this because I am again hosting our Thanksgiving meal tonight.  So no matter what your reasons are for needing to start new traditions for a holiday, there are plenty of ways to spice up a special day.
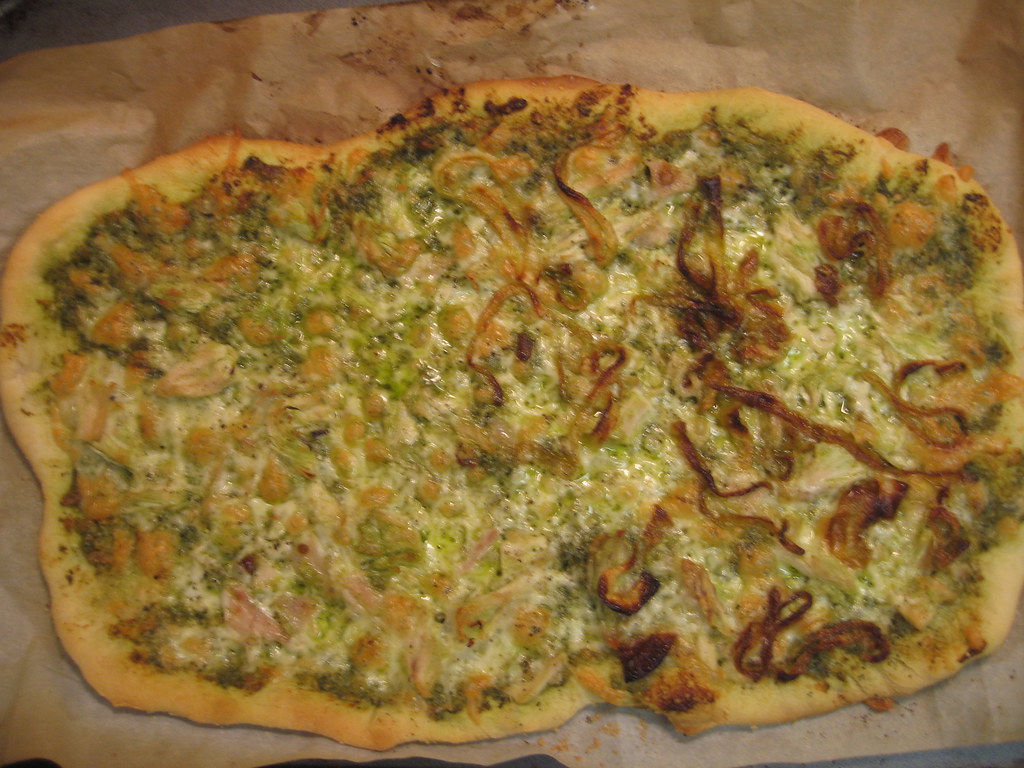
Life has been a little busier this fall so it will not be quite the same soiree(I think we might have set the bar too high), but I want to keep the tradition alive.  No costumes this year, but the menu is a Thanksgiving dinner with a twist.  I will get back to you shortly with recipes and how all of that goes.


My father... taking his role as an Indian very seriously.

11.15.2009

Artichoke, Arugula & Prosciutto Pizza

IMG_5556

I lied... I said I was done with pizzas for awhile, but I just couldn't let them go.  With a few random ingredients in my fridge, this pizza was created.  When there is a little of this and a little of that, a warm crispy, chewy crust is just what they need.  This pizza was created because I happened to have all of these ingredients on hand except for the prosciutto.  So I had the deli department give me just a few slices of prosciutto and dinner was done.  And I have to say I have now really (no, really this time) found my favorite pizza.  I am sure you are a bit over hearing that since I seem to announce that every week, but this is it! This is really it! The best homemade pizza I could ever imagine!  It might have something to do with the fact that artichoke hearts are one of my favorite foods so to pair those with the salty prosciutto, fresh pesto, peppery arugula, fresh lemon, and hearty mushrooms was just one of the best things that has ever happen to me.


'

Artichoke, Arugula & Prosciutto Pizza
Ingredients
1 ball of pizza dough (store bought of homemade)
3 tablespoons fresh pesto
2 cups mozzarella cheese
5 artichoke hearts (one can), quartered
5 white button mushrooms, sliced thinly
1 ounce thinly sliced prosciutto
2 tablespoons parmesan cheese, grated or shredded
1 1/2 cups arugula leaves
1 1/2 tablespoon fresh lemon juice
Step by Step
1.  Preheat oven to 425 degrees.
2.  Heavily flour a clean surface.
3.  Roll out pizza dough on floured surface into a rectangular shape that will fit a baking sheet.
4.  Cover baking sheet with parchment paper.  Transfer pizza dough to parchment paper.
5.  Spread a thin layer of pesto on entire crust.
6.  Top with mozzarella cheese.
7.  Top evenly with artichoke hearts, prosciutto and mushrooms.
8.  Top with parmesan cheese.
9.  Heavily pepper pizza and lightly salt.
10.  Bake for 15 minutes.
11.  While pizza is baking, toss arugula with lemon juice.
12.  Remove pizza when the edges are brown and the cheese is bubbling.
13.  Top with arugula and cut into slices.
14.  Serve hot.

11.11.2009

Sliders


Oh, I love a good burger.  I am not the type to order one just anywhere I go, but a well seasoned burger with my favorite toppings is a favorite.  When I saw Ina make these the other day, I knew I had to try them.  This was my first attempt at finding a good hamburger recipe and my search is over. There is so much flavor in the meat and the combination of herbs and spices makes for a very tasty burger.    This was delicious and sliders are easy to handle and allow you try try different combinations in one meal.  For example, we had half with blue cheese and half with cheddar.  Whether you are feeding two or a crowd, they work for anything!
From my little kitchen to yours... enjoy.
Sliders
Adapted from Ina Garten
Recipe Notes
Ina's original recipe called for thyme.  I had rosemary on hand so that is what I used, but either will work great.  I also added the worcestire for an extra kick, but if you do not have any on hand, you do not need to worry because you will still have very flavorful burgers.  For the buns, I used kaiser rolls, but any mini sized bun will work.
Ingredients

  • 1 pound premium ground beef (80 percent lean and 20 percent fat)
  • 1/2 tablespoon good Dijon mustard
  • 1 1/2 tablespoons good olive oil, plus extra for brushing the grill
  • 1/2 teaspoon fresh rosemary, chopped
  • 1 1/2 teaspoons chopped garlic
  • 1 teaspoon kosher salt
  • 1 teaspoon freshly ground black pepper
  • 1/2 tablespoon worcestire sauce
  • 6 thin small slices of your favorite cheese (I used sharp cheddar on some, and blue cheese on others)
  • 6 small buns (I used kaiser rolls) brioche buns work well too
  • 2 ounces baby arugula
  • 1 medium tomato, sliced in 1/8-inch-thick rounds
  • 1 small red onion, sliced in 1/8-inch-thick rounds
  • Ketchup, for serving
  • Step by Step
  • Heat a grill or grill pan to medium high heat.

  • Place the ground beef in a large bowl and add the mustard, olive oil, rosemary, garlic, salt, and pepper. Mix gently with a fork to combine, without compressing the meat. Shape the meat into 12 (2-inch) patties of equal size and thickness.
    When the grill is medium-hot, brush the grill grate with oil to keep the sliders from sticking. Place the sliders on the grill and cook for 4 minutes. Turn the sliders over with a spatula and cook for another 4 to 6 minutes, until medium-rare, or cook longer if you prefer the sliders more well done. For the last 2 minutes of cooking time, place 1/2-ounce Gruyere on the top of each burger and close the grill lid. Remove the sliders to a platter and cover with foil.
    Slice the buns in half crosswise and toast the halves cut side down on the grill.
    Divide the baby arugula among the 12 bottom buns, top each with a slider, and finish with a slice of tomato and red onion. Cover with the top of the bun and serve hot with ketchup.


Makes 6 sliders


11.09.2009

{venturing outside the little kitchen} Mastering Masa Dough @ Sur La Table


There are just some things I don't like to try and figure out on my own.  Making my own tortillas and tamales has been on my list of things to do, but just didn't sound like something I wanted to try and figure out from a recipe on my own.  So that led me to Sur la Table's cooking class "Mastering Masa Dough."  I have always wanted to go to their cooking classes, but they are not the cheapest endeavor so I wanted to make sure I found a good one.  And let me just tell you, it was definitely worth it.  I met some of the most interesting people and had a wonderful time making tortillas, gorditas, tamales, empanadas and sopresas.  I will not go into all of the recipes right now, but as I make them again, I will share.  For now, I just wanted to give you a little sneak peek.  I will say with a class that was this jam packed with dishes, I did not master one thing.  However, it was just enough to have me trying all of these recipes in my own little kitchen.


11.04.2009

Canadian Bacon & Black Olive Pizza


Have I convinced you to make a pizza yet?  You are either loving all of the endless combinations of pizzas you can make or you are so over it and wish I would get over it too. But I had to share just one more amazing combination.  I never thought of my brother and I as the gourmet types growing up, but I sometimes think I should reconsider that notion when I think back on the fact that canadian bacon and black olive pizza was our favorite to order on those special nights when we had a babysitter.  Sure our other 5 to 10 year old peers were in love with cheese or pepperoni, but among the very few things my brother and I agreed on growing up, this yummy pizza was among them.  So with my new found love of pizza at home, I decided to take a stab at it and it was perfect, and for me, nostalgic.  I also got quite excited when Mr. Hungy said this is his favorite pizza to date and he has become quite the honest critic.  Once again, this pizza was thrown together in minutes on a busy Monday night.  If this combination does not look like your favorite, I hope at least I have convinced you by now that you should try any of your favorite ingredients on this crust and have scrumptious homemade pizza any night of the week.  
From my little kitchen to yours... Enjoy.


Canadian Bacon & Black Olive Pizza
Recipe Notes
I have not listed amounts of the ingredients below.  I think each ingredient can be left up to personal taste.  Some like alot of cheese and a little sauce... some like a lot of canadian bacon and black olives... i think you get the point.  
Ingredients
1 ball of pizza dough (click here for recipe or use store bought)
Marinara sauce
Cheddar Cheese, shredded
Black Olives, sliced in half vertically.
Canadian Bacon, sliced into triangles
salt and pepper
Step by Step
1.  Preheat oven to 425 degrees.
2.  Sprinkle a clean surface with flour.  Roll out pizza dough into a rectangular shape that will fit a baking sheet.
3.  Cover baking sheet with parchment paper.  Transfer pizza dough onto baking sheet covered with parchment paper. 
4.  Spread a thin layer of marinara sauce over dough.
5.  Sprinkle cheese over entire pizza to make a thin layer.
6.  Top with canadian bacon and black olives. 
7.  Bake for 15 minutes until crust is crispy and brown.  

11.02.2009

Apple Bread


Finally... it is under 70 degrees here in Houston.  (Well, it keeps creepin up, but today I actually wore a scarf and it was glorious).  Whether the weather is cooperating or not, this apple bread will make you feel like you are in the midst of fall no matter what the temperature outside is.  This is one of my favorite fall recipes and it takes very little time to put together.  It's one of those recipes that a slice is just as good as breakfast, as it is for a late night snack.  The only problem is, it never lasts more than 24 hours around here... no matter how much I make.  
From my little kitchen to yours... Enjoy.

Apple Bread
Recipe Notes
I used honey crisp apples, but I am sure any variety that you like would work just fine.  This batter gets very very thick.  I suggest using a sturdy wooden spoon to stir in the apples.
Ingredients
1 C. canola or vegetable oil
3 eggs
3 C. flour
1 tsp. baking soda
1 tsp. salt
2 C. sugar
2 tsp. cinnamon
1 tsp. vanilla
3 C. chopped apple (peeled and cored/ chopped into bite size pieces)

Step by Step
1. Preheat oven to 300° F.
2. Beat sugar and oil together.
3. Add eggs and vanilla.
4. Combine dry ingredients separately, and add slowly to wet ingredients.
5. Mix in apples using a sturdy spoon, because the batter will be very thick.
6. Sprinkle generously with sugar after baking.
7. Bake in 2 large loaf pans for 1 hour 15 minutes. 


Makes two large loaves.